
This is a guest blog by Daniel T. Jester. All images by Daniel T. Jester. Used with permission.
One of my favorite things to do is leverage my skillset as a product photographer and help small businesses with their photographic presence. A business’s image identity ties directly in to their brand, but the challenge of shooting product is only a small part of the mountain of things that need to be done day to day.
Recently I had the opportunity to meet up with Emily Kaniasty of Art & Soul Beads (artandsoulbeads.com) and Amanda Dougherty of The New Blak (thenewblak.com) at their storefront space in Louisville, Kentucky. They were looking for a little help in shooting their jewelry for their respective websites. I brought along some of my favorite LumoPro tools, and we set out to shoot some jewelry, as well as some editorial shots to be used in social media.
For their website images (what we call “catalog images” or primary selling shots), Emily and Amanda were looking for a clean, on-white presentation of some of their pieces. My set up of choice for this situation is a clear plexi or glass plate, separated from the white background. This allows us to light the background separately and control the output without too much worry of spill onto our necklace. We weren’t going to have a ton of space to set up in their retail location, so I needed a set up that was compact, but could get the job done.
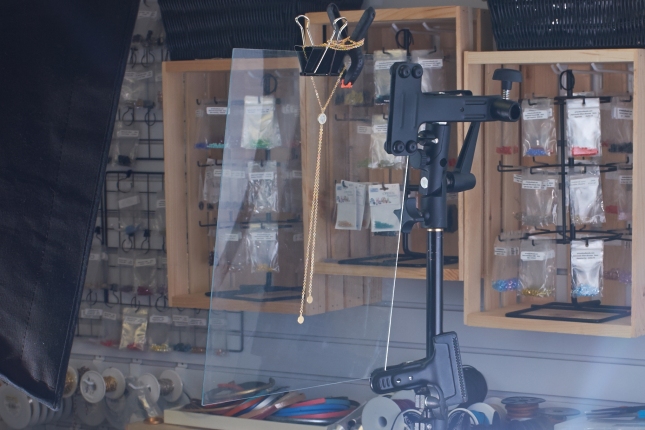
Spring Clamp mounted on LP634 Umbrella Swivel holds the glass in place.
My background was a simple white collapsible reflector hung on a light stand. The glass plate where our necklaces would hang was held up with one of my new favorite grip tools, the LumoPro Spring Clamp. The Spring Clamp, in this case coupled with the LumoPro Umbrella Swivel, is a really great tool for holding stuff. It functions perfectly here – holding my plate glass in place and giving me a solid spot to put our product.
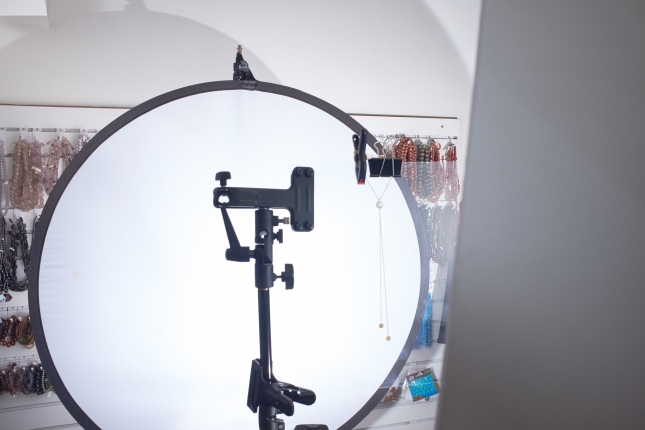
White reflector serves as the perfect compact background.
Clamped onto the stand holding the plate, was the LumoPro Studio Clamp with an LP180 aimed toward our backdrop. Rounding out the rest of my set up was my LumoPro compact stand, used here because I could use it on top of the existing work table without it putting my light too high. Up top was another LumoPro LP180 with the double flash bracket and 16″x24″ soft box.

7.5′ Compact Stand holds the Double Flash Bracket and small softbox as the key light.

Pullback view of the whole setup. Lots of light in a small space!
Last but certainly not least, we had PLENTY of fill cards on hand. The trick to shooting jewelry (or anything reflective) is that it doesn’t matter how much light you throw at the subject, if the light is reflecting off the piece and out into space, your subject is going to appear dark. You need to put a fill card in the reflection to capture that light.
In the end, using some of my favorite LumoPro gear, we were able to set up a robust jewelry photography set that didn’t take up a ton of space and could be packed into a fairly small bag.
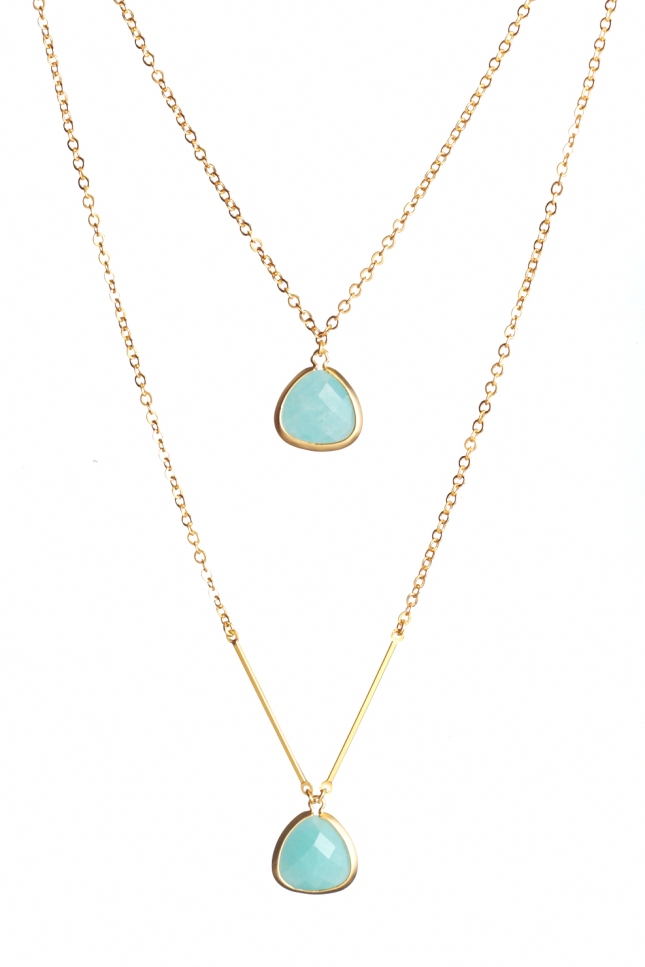
The final product. (See what we did there…)
Technical Details:
Camera: Fujifilm X-T1
Lens: Nikon Micro-Nikkor 55mm Macro
Strobes: 2x LumoPro LP180
Modifiers: LumoPro 16×24” Softbox
Radio Triggers: Pocket Wizard Plus III
Connect with Daniel on Twitter or his blog. Or see more of his work at http://www.danieltjester.com/.
